Monday, October 17, 2011

HDR for Portrait shot


This is just a raw example of HDR, I have not really go and fine tune the result, But as you can see, from the 3 different exposure, none of it is good, because when the subject is brighter the sky just seems to be too bright and when you can see the sky, the subject face will be too dark. Usually taking a flash is just for short distance, so the best way to do it is HDR. Of course we don't use the surreal and dream like settings that color dodge and burn everything. Just use the normal combination settings will do. If you are using photo shop, a fast tone mapping will do the trick, Or using layered is possible too.

Photography Skill VS Photoshop Skill

Given that you have decent DSLR camera body+a decent lens. They other major factor of producing a stunning photo might be just skill. But whether it is photography skill or Photoshop skill. I believe will be a lot of argument. Nonetheless I believe the fundamental of Photography skill is utmost important if you don't rely too heavily on photoshop or I would say post processing.


Remember when we are in olden days, we do not have any Digital camera, our films counts are about 36 pieces in one single roll. That's really precious film count. Everything is film and analog with hard copies. Photographer skill are really important, because they have limited shoots that time. Capturing the moment is really an important skill. But when Digital camera is introduced, there are many photographers just capture everything and decide the "moment" later. If today your camera just allows you to capture even 100 pictures, I believe the photographers will just throw it away or replace it with another with bigger capacity.


With today technology, we also can do something that hardly achieve 20 years ago. HDR photography. Most of our DSLR comes with bracketed exposure shooting. Camera will shoot 3 consecutive images with 3 different exposure depends on your settings. It seems a dull picture can be easily merged to HDR image to create a stunning picture. Using either photoshop or photomatix, this is an easily task as 1,2,3


If you have a decent DSLR, it should allow you to take bracketed images. Just make sure to have a tripod if you don't have a fast burst rate. Either use a photoshop or photomatix, then you should be able to produce below photo easily. If you need in depth tutorial, perhaps you can refer to other side first. I will write up a detail tutorial later.


Here is the final result of the photo. Though it looks abit dark and surreal. That's what make the photo looks like a painting. Nonetheless the photo can be fine tune to many other settings. As usual, if today you are not a too good photographer. 


Perhaps HDR can be another solution for you to produce stunning picture. If you can spend more time on photoshop and also post processing, a better fine tune picture can be produced. As usual, HDR is best for landscape photographer. For Portrait it can be useful, if your subject is facing under the shadow, and you do not have a powerful flash gun.


Sunday, October 16, 2011

HDR using Photomatix


The two photos above are using more dreamy and surreal settings.
The first photo was taken when I was riding on the ferry toward Pangkor Island.
Second photo was taken at jetty, because the lighting is abit dark,that's why I have decided to take it using bracketed exposure. It turns on to be the most impressive HDR among all 4 photos.


Wednesday, October 12, 2011

Moon shooting with Sigma 150-500mm

Just once a blue moon I get the chance to do this with my tripod at mid night 12AM.
Nothing too fabulous and nothing too bad  I guess. 


 This is actually not the first photo I took, but some how the sequence got jumble up. This is the picture that I shoot with much lower exposure so I can actually see the moon surface.


Brighter version with cloud surrounding  the moon 


Well again.. with a better view of surrounding. 


And Finally, a crop and more detail view of the moon!


Friday, October 7, 2011

Daily Photography using Tamron

Though Tamron 18-270mm is a cheap lens, the image quality and also build quality is no match for any canon L lens. But with the versatility and also minimum focus range, it can be a very useful daily life general lens, that can cover from wide angel to telephoto for some wild life and even close up macro for food photography. But I admit I am not that good on food photography, since I don't own a food blog, but you can always visit my friend food blog at  http://kitchenexperiments.net/

So happen these 2 days I travel north to Penang to conduct some system installation and get chance to listen to Datuk Bryan sales training. But without delaying let's start with some Food picture. 

Chris is eating this Sotong mix rice. It looks delicious from the picture. But I have not really tested it. (Sotong=Squid in Malay). If you look at the image quality from here, it is definitely more than usable. Perhaps the slight Bokeh here is attractive too. 


Thanks to the short focus range, we can actually use the zoom in and close up shot for food. If Tamron were to make a shorter focus range in the next 18-270mm or 18-300mm zoom lens. This will come in handy especially on travel when you want to snap a pic of those delicious food you have come across.


Here, we have some standard 35mm zoom pic. Nothing too exciting or too special here. This is Nam Heong one of the famous old town restaurant in Ipoh before they started with Ipoh Old Town white cafe Chain and get listed on Bursa Malaysia. The food hmm... you got to visit and decide how good is it. No comment..


This picture is actually taken at 270mm zoom with F/6.3 aperture. The image quality is considered quite decent without cropping it 100%. I didn't try to stop it down to F/8. As expected, if stop down 2 steps will produce quiet a remarkable image quality. Of course again it still no rival for F/2.8 EX or L lens from Sigma and Canon

Another pigeon, it seems like the skin a bit peeling off due to urban pollution. The Bokeh looks a bit dreamy and also slightly distorted. But overall, it seems to give some nice effect. 


Just some standard snap shot for the company chain I have been working on. Miracle Hair Expert!, if you have any problem with hair in Malaysia, they are the expert. Please visit them for more information. Overall not bad image quality huh?


The training took me the whole afternoon until night falls. So I didn't manage to capture too many pictures because we are all hungry and rushing for dinner. Just before I sit down for dinner, I manage to capture tallest building in Penang (Komtar). 


This picture looks abit soft, might be due to focus or may be slow shutter speed. But at least we can see how sad the dog looks. This is about 200mm+ zoom taken with handheld with slow shutter speed. It is a low light night scene, so expect some ISO noise.


Our second day training at Eastin hotel.


This is Dato Bryan Tay, the CEO of Miracle Impress Sdn. Bhd. His sales training is impressive just like his company name. This photo looks like a paparazzi has taken his photo for newspaper release.


Alan brought me for another famous Mee Sotong(Squid). We ordered 4 plats for 3 person. It is a must EAT in Penang!


So Because we went home, we stop by Bukit Tambun Jeti, to have some seafood dinner. Though is a bit early at five o'clock. Overall is a satisfied meal.


This is another street shot taken at Ipoh. On that day the cloud really looks special. I quickly snap it with the street view


I believe this is the BEST photo I have taken through this journey. It is actually taken with 1.6second shutter speed. The uncle is frying kuay teow with Charcoal. It is one of the most famous char Kuey teow in penang. So you must try if you are there!


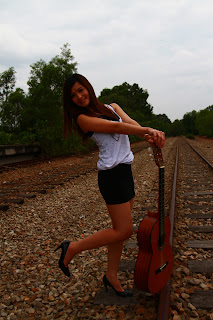
Now at last we have some portrait shot, if you need to shoot a portrait with Bokeh, I guess Tamron will be hard to achieve. If you are shooting for some wide angle portrait with nice scenery I guess Tamron can do it quite well. Of course here I have stop down the F to 5.6

I took this photo at 18mm and stop down to F/5.0 or 5.6 if not mistaken, Everything looks cool here with. If you crop the picture or zoom in detail enough, the CA and color fringing are actually quite bad. You can try looking at those 2 wooden vertical "stick". Overall still a nice picture to have.


Tuesday, October 4, 2011

Zoom range test for Tamron 18-270mm

This is the shot taken at 18mm at my balcony. You can see there are 3 cranes building up another few Condos. At wide open, I guess the image quality is OK, and everything just seems to be OK, if you wanna get a better image quality Stop down to F/5.6 should be good. at F/3.5 is just a bit soft. All photo are taken using Canon 7D, which means it is an APS-C sensor, not full frame. So the zoom actual focal length should be X1.6


I just zoom into 35mm, everything seems to be just normal, nothing great nothing too bad.


50mm zoom in. Actually the image quality is getting a bit sharper here. Perhaps that is the optimized zoom range for this lens. If you are aware of the zoom range, it is about 3X from 18mm. This image quality can be easily comparable to other competitor such as canon and sigma. Other than that, you can complain too much with kind of "affordable" price. For portrait and normal photo shooting. 18-55mm lens with F/2.8 is always preferable compare to this zoom lens. If you are going for F/2.8 lens at least get a sigma if you can't afford canon.


Now we are at 70mm zoom range. No doubt the image quality is quite decent here. But it still can't rival at 70mm F/2.8. For general purpose usage, it is comparable to sigma and canon multi purpose zoom lens.


This is 100mm zoom range. The image quality is still quite decent. Stepping down 1 or 2 stops usually will help to improve image quality. 


Now we have come to 200mm zoom. The vignetting is observable at the corner of the image. the contrast is weak here. CA starts to crawl out in this picture too.


Not much I wanna comment here. You should this is the 270mm end zoom. If you crop it 100% you should see the image is soft, it has color fringing and it has CA. But if you look it from this picture, it is still quite usable. For telephoto zoom, most likely the subject will be at the middle of the picture. For border and extreme edge, it is soft, less contrast with some vignetting.


Because it is a general purpose lens, so it is not great in any aspect, but it is a great general purpose lens that offers focus length from 18mm all the way to 270mm. If you were to carry F/2.8 lens, you might need 2 to 3 lens to cover all this focus length. The weight will be 10 times more than this lens if you add on a 17-55mm F/2.8 + 70-200mm+ anything to 300mm. 


Yes, again this is a general purpose lens. Walk around lens that covers from wide angle till 270mm telephoto zoom range. Sometimes you just want to capture the moment, and this lens might give you a shot of what you want. But for professional that stress too much on Image quality, this is definitely not their choice. May be a poor paparazzi might prefer this?

Another HDR Pic


HDR Processing Pic


Out of boredom, I just did some HDR Processing. for the photo I previously taken. These 3 photos are just single JPEG, not different exposure HDR. So you can considered this FAKE HDR.

But nonetheless it looks pretty good compare to the original file. HDR should not be used on potrait photo using this method, because this might make your skin tone too saturated.

Saturday, October 1, 2011

Tamron 18-270mm Street Shot


Actually, today suppose will go to bird park for some telephoto shoot out. But because the weather didn't permitted, I brought my Tamron lens around and shoot some random pictures. Most of the pictures not are not too usable and have no subjects. But at least these 2 pictures have something to show.

Just some random test short from inside my card